All you need to know about soil sampling
When sampling soil, the following goals are pursued: to determine the average nutritional status and the degree of its variability in the area. The proper use of fertilizers, based on accurate information about the soil nutrient levels in the plots, leads to an increase in yield, lower cost and lower environmental impact. Knowing the changes in the nutrient content on the area, you can make mineral fertilizers, given this variability.
Definition of a sampling method
With the development of technologies and procedures for the use of fertilizers, manufacturers can collect the necessary amount of information about changes in the amount of nutrients in the soil within the field. Before sampling, decide how the information received on fertilizer application will be used, and this will help determine which samples should be taken. For uniform fertilizer application, take soil samples randomly within the selected area. If you plan to apply fertilizer in previously planned places, a soil sample must be taken in certain application zones or in areas with known coordinates.
Sampling methods
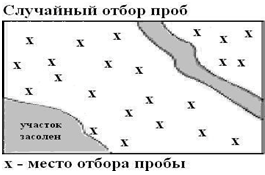
Random sampling (Random) is a traditional method that works for homogeneous fields with minor changes. The method displays the average field indicators, the average number of all samples taken from the entire field area.
Reference sampling (Benchmark) – Recommended for fields with a large number of changes to the field (hills, various terrain changes, etc.). Reference sampling reduces the natural variability of the field, reducing the size of the selected field by dividing it into elementary sections (5-10 hectares). Accordingly, after the analysis, recommendations should be given on fertilizer application for each such site.
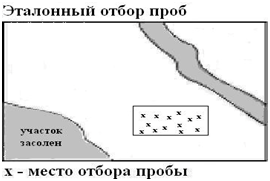
The reference area should be (maybe) marked using the global positioning system (GPS) or by other means so that you can return there to carry out sampling and fertilizing in this area. Sampling at the same location in the field will show a picture of annual changes in the field.
Analysis of several separate reference areas in the first year will reduce the risk of obtaining incorrect values from the field that do not meet the general indicators of this field. On the other hand, these technologies are more expensive for laboratory analysis. This method helps to determine areas for reference sampling in the future.
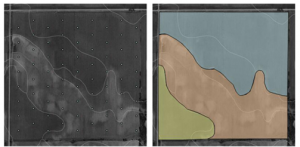
When choosing reference samples, use prominent features such as soil color and landscape to identify different types of soil. Choose a site that has features similar to most of the field or the dominant type of soil.
The best time to do soil analysis is after the harvest. At the beginning of the growing season, it is easier to choose the conditions for creating the future crop. There are other ways to select potential reference areas.
The process of dividing the field into smaller sections for sampling is necessary for different types of soils within the same field. This approach is especially effective in hilly terrain.
Each site (with a specific culture and field history) must be selected separately. Rate each site by observing changes in yield, crop growth and development, structure, color, erosion, and soil drainage. Plots of fields where plant growth and development are significantly different from the rest of the field should be selected separately.
Avoid areas with old straw, hay, highly fertilized, with salt spots on the soil, etc. Select 15-20 sampling sites in one study area.
Homogeneous fertilizer application
Even if the fertilizer is applied uniformly, it will still be useful to have information on the variability in the nutrient content of the soil at the site. Knowing this will allow you to adjust the norms, application time and type of fertilizer. Collect soil samples from areas within the field that are relatively uniform. These sites can be determined based on the type of soil, topography, degree of erosion, field history, differences in yield and any other factors that can affect the level of nutrients in the soil.
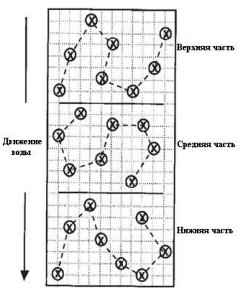
Avoid ‘dead’ plots on the field (eroded plots, car turning plots, abandoned places or animal feed areas), or take individual samples from them. Soil samples from these sites can differ significantly in results from the rest of the field. When taking samples from irrigated areas of the field to determine residual nitrate nitrogen, take them from the upper, middle, and lower parts of the field (Figure 1). The amount of irrigation water that is absorbed into the soil will affect the amount and depth of leaching of nitrate nitrogen in the soil.
Changing the rate of fertilization
There are two main approaches to sampling for a particular area where fertilizer is planned – grid sampling or based on dividing the field into zones. Both approaches provide complete information on changes in the level of nutrients within the field. Grid sampling is more expensive and time-consuming, but will provide useful information in order to change fertilizer application rates over several years. Zonal sampling is based on information obtained from various information sources – field maps, soil surveys, aerial photographs, etc. Often, information from several sources can be combined to obtain sampling areas. Figure 2 shows the division of the plot into the grid and the zones for sampling from the field.
Choice of the optimal sampling depth
Soil samples from a depth of 0-20 cm are used to determine the pH of the soil, the need for liming, organic matter, the content of phosphorus, potassium, sulfur and zinc. The correlation of the results of soil analysis and calculations are selected for samples taken from 0-20 cm. With regular sampling, it is necessary to observe the same depth of sampling from the field, this will allow you to compare the results of the analyzes and trace the trend. Sampling deeper than from 20 cm leads to a decrease in the accuracy of the analysis results for organic matter, phosphorus and zinc. Potassium and pH values may increase, decrease, or remain the same in samples from greater depths. Samples from a depth of 0-20 cm are taken for all crops. Fertilizer recommendations for all nutrients are based on their content in the soil sample. Recommendations for nitrogen, for many crops, are calculated taking into account the content of organic matter and residual nitrate nitrogen in the arable layer of the soil.
The accumulation of nutrients in the soil can occur when the fields have not been used for several years, higher concentrations of nutrients will be observed closer to the soil surface, mainly in the 5-10 cm layer. The use of nutrients in the fields where they have accumulated is not a problem, since plant roots can efficiently receive nutrients from the upper layers of the soil. If nutrient accumulation occurs and samples are not well mixed, there is a greater risk of providing a non-representative sample to the laboratory and making inaccurate recommendations.
Samples from a depth of 0-20 cm and below are necessary in order to accurately assess the amount of nitrate nitrogen in the root zone, because nitrogen in a nitrate form is easily leached (washed) by water into the subsoil layers of the soil. Nitrate nitrogen in the root zone is easily used by plants. In most soils, the roots of annual plants penetrate to a depth of 120 cm or more. In order to accurately determine the nitrate nitrogen content in the root zone of plants, soil samples should be taken from a depth of 90 cm. The sampling depth for nitrate nitrogen 60 cm is the minimum depth recommended for nitrate nitrogen, and it will not allow to determine the available nitrate nitrogen for plants so just like a sample from a greater depth. For crops with shallow root zones, such as beans, rape and millet, a 60 cm sample is optimal. If soil samples for determining nitrate nitrogen have not been taken from subsurface horizons, nitrogen recommendations for crops will be based on historical averaged data on nitrate nitrogen, and the accuracy of fertilizer recommendations may be reduced.
Sampling averaged sample
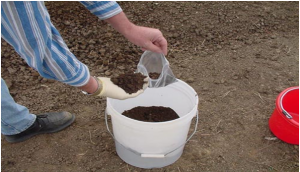
In each area of the site that has been allocated, take several soil samples in a random order (in the event that soil samples are not taken by squares). Make sure that these samples represent the entire area. Be sure to take the entire soil layer 0-20 cm to analyze the soil for nutrients. Place individual soil samples in a clean plastic mixing bucket. If sampling in layers, then a separate bucket should be used for each layer. Break and completely mix soil samples in each bucket after sampling the entire area. After mixing, save a portion of the mixed soil and place it in a signed box or bag to send to the laboratory for analysis. As a rule, the mass of the soil sample should be ≈ 500 g. A typical label on the box should include the name of the farm, the number of the field and sample, and the depth of selection (Figure 3).
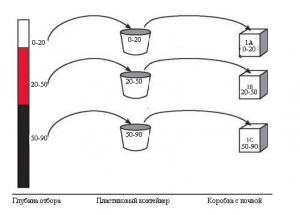
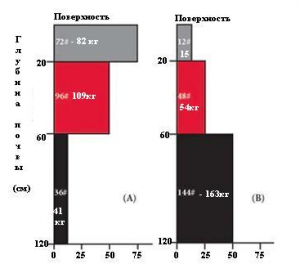
If you take soil samples for layer-by-layer determination of the element content, then the boundaries of the arable and subsurface layer must be observed accurately and without gaps. For example, with a sample of 0-20 cm, take a subsurface sample from 20-90 cm. However, detailed information on the vertical distribution of nitrate nitrogen in the area can be obtained if a sample of the subsurface layer of soil is taken from layers 0-20-60-90-120 cm Such a soil sample has several advantages over a single subsurface sample. It is difficult to obtain a well-blended, representative sample from samples spanning a wide range of depths. Changes in soil structure and moisture with depth, together with a large volume of soil, make mixing a time-consuming process. In addition, the concentration of nitrate nitrogen in the soil is likely to change with depth. In a well-selected sample, the concentration of nitrate nitrogen decreases with depth, but this does not always happen. If there is an increase in the concentration of nitrate nitrogen in the deeper horizons of the soil, this may be caused by dry conditions during the period of plant growth, followed by an increase in soil moisture and the removal of nitrogen with the crop, in which case the value of nitrate nitrogen in the subsurface layer for plant nutrition can be estimated too high. Figure 4 shows two situations where the total amount of nitrate nitrogen in the root zone is the same. The situation in Figure 4a is typical. In Figure 4b, a significant amount of nitrate nitrogen is contained deep in the root zone, this position can lead to a deeper leaching of nitrate nitrogen outside the root zone before the roots of the plant can reach this depth. For situations like in Figure 4b, it will be necessary in the recommendations to increase the norms of nitrogen fertilizer due to the low probability that the plant will be able to use these reserves.
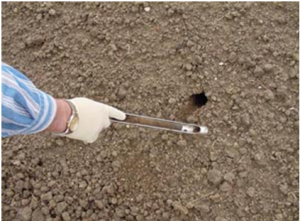
Sampling equipment
Soil samples can be taken using a soil auger or probe. Soil probe is the most convenient tool for sampling soil. It will allow you to select a solid soil sample with minimal introduction of bordering elements into it. On many soils, the probe can be placed in the same hole to take a sample from the next depth. Since usually a slight contamination of the subsequent sample occurs with soil that is poured from above. The soil probe cannot be used when the soil is too wet, too dry, stony or frozen. On clay soils there may be problems with sampling, but they can be avoided by using a special tip designed for dense clay soils, taking samples in wet and dry conditions, lubricate the tip with silicone.
Soil drill can be used on stony or frozen soils. If the soil is too wet or dry, mixing of samples from different depths may occur. A soil drill is not suitable for sampling on too dry and dusty soils. Use a soil drill only if probing is not possible.
There are also a variety of hydraulic or mechanical samplers for taking surface and depth samples. Their diversity is great and they greatly facilitate sampling, especially when taking a large number of samples from different sites.
Sampling time
Sampling must be carried out immediately after the harvest, this will be the best option for you to get test results, recommendations and you can use the information in drawing up the fertilizer application plan for the next year.
Soil samples submitted to the laboratory should provide reliable data on all identified indicators. However, a large time interval between the time of sampling and the time of sowing of grain crops, can lead to some leaching of nitrate nitrogen from the root zone. Loss of nitrate nitrogen during leaching occurs due to winter or spring snow melting and high soil moisture.
Sampling can also be done in spring. But there may be a delay in sampling, since a large amount of soil moisture in the root zone will not allow proper sampling. Sampling in the spring is the optimal time for analysis on the content of nitrate nitrogen in the subsoil layer of the soil.
Sample Preparation
When taking and preparing a sample, do everything possible to avoid contamination. Use clean samplers and plastic buckets to get and mix soil samples. Do not leave samples moist in a warm room for more than 24 hours after sampling. If raw soil samples are stored for a long period of time, additional mineralization of the organic matter may occur, nitrate nitrogen concentrations will increase, and the content of other nutrients may change. If samples cannot be delivered to the laboratory within 24 hours after collection, they should be dried, cooled or frozen. Dry the soil samples in a dry, ventilated area for two to three days. Do not dry the soil samples at high temperatures, as this may affect the results of the analysis. The optimum temperature is 35-37 ° C. Avoid contamination of samples when dry. Cooling or freezing the samples will slow down or completely stop the microbial activity if the samples cannot be dried and sent to the laboratory.
Contact your laboratory for packaging and for all necessary sampling instructions. Fill in special forms (order sheets) and boxes provided by the laboratory, mark each sample with your name, address, zip code, field / sample number and the depth with which the sample was taken. Repeat these steps for each sample that will be selected for analysis. Provide complete information for each soil sample on the order sheet provided. If there are any unusual / specific problems in the fields, they should be noted in detail. Leave the final sample plan in the laboratory and with you.
Laboratory analysis
Consult your laboratory for laboratory soil tests. Soil analysis should include soil tests for nitrate nitrogen, available phosphorus, available potassium, sulfur, soil acidity (pH), salinity and organic matter content (soil potential). Analyzes are also carried out on micro and macro elements, such as: boron, molybdenum, copper, iron, manganese, zinc, cobalt, magnesium and calcium, mechanical composition (particle size distribution).
Write to us
and we will find an opportunity
for cooperation

